The Illustrator pen tool is our first tool for making vector drawings. It’s not our only tool.
You may have very nice projects in mind. But if you want to be a professional designer, you should learn how to hold and use the Pen tool before you draw. In short, this article focuses on how to draw, not what to draw.
In the first chapter, drawing straight-line using the pen tool is explained and derivatives of the pen tool are shown. Section 2 explains how to make curves in illustrator. The last section deals with how to draw using a template picture and what should be paid attention to.
Pen tool
The Pen tool is located in the tool panel on the left side of the illustrator user interface as shown in the below figure. It is used in both straight-line drawings and curve drawings.
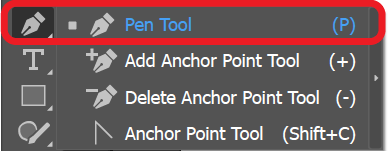
The icon is pen-shaped. The keyboard shortcut is the letter P. You can pick up the pen by clicking the icon on the tool panel with the left mouse button or pressing the letter P on the keyboard. When the pen tool is active, the cursor takes the form of a “Pen icon” as in the tool panel. And, the bottom right corner shows the icons to help you along with the drawing. .the reason for the shape x (cross) instead of the pen shape after clicking the pen tool, is the Capslock key. The cursor is called precise. You can restore it by turning caps lock off. Drawing with the x- shaped cursor is said to draw more accurate, but personally I did not feel the difference in my own drawings.
The pen tool in the illustrator is held with two hands. ?
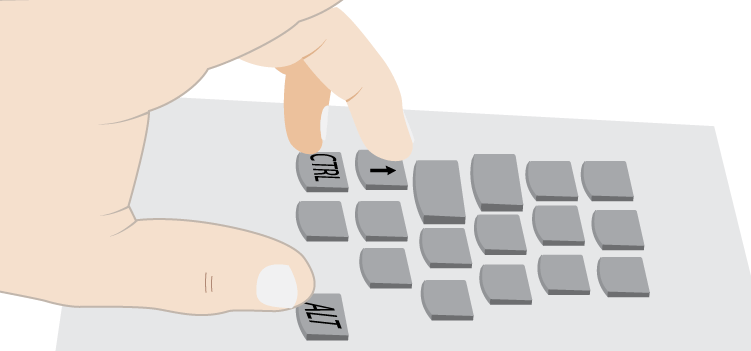
Do not be surprised. The drawing is done with the right-hand mouse and the left-hand keyboard shortcut keys. With the mouse in your right hand, the cursor is directed over the workspace, while the keyboard keys with auxiliary tasks are controlled by the left hand.
There are three keys you will use frequently throughout the drawing. These are: CTRL / Command, ALT / Option and Shift / shift. In rare cases, the space key can also be used.
In this article, explanations are made for the windows version of an illustrator with an English interface. The software version used is CC 2017. Therefore, PC / laptop users should position their left-hand fingers as shown below when drawing with the pen tool. Practice CTRL with your ring finger, SHIFT your middle finger, and ALT with your thumb.
Part 1: Straight line drawing
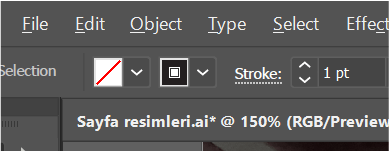
Before starting the drawing, delete the line fill from the control panel at the top of the illustrator interface and set the line thickness (stroke) to 1 point in black.
Now, let’s make a drawing together as below. (Not the figures. Just the line. 🙂 )
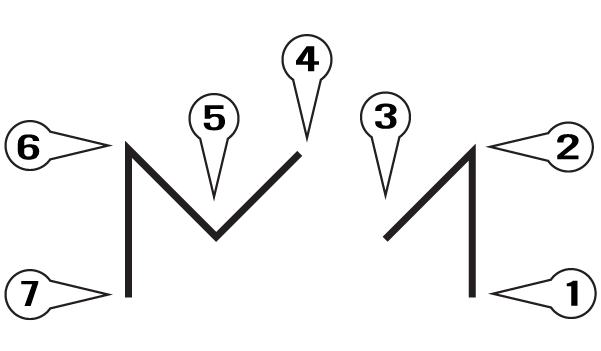
- Select the Pen tool (P).
- Click anywhere on the artboard. This will be your 1st point.
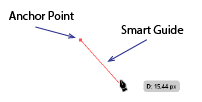
The first click creates the starting point of your line. It is called the Anchor point. The Smart guide appears when the mouse has moved away from the first Anchor point. This smart guide provides information about the direction of the actual line you will draw. If you do not see smart guides, make it visible with CTRL + U.
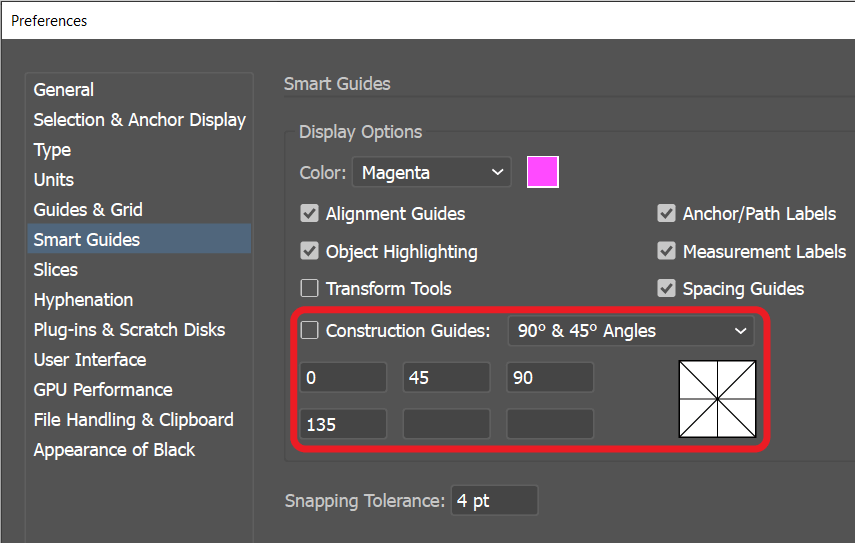
You can select the direction you like. If you want the angle value to be constrained, you can fix it to 45 ° angles with the mouse movement by holding down the Shift key. If you have an angle value that you want to work with, you can also adjust it. You can give the desired angle values by selecting Edit> Preferences> Smart guides. In the movement made by holding down the Shift key, the smart guides will now be fixed at the angles you specify.
- Now place the second and third points, as in the example.
Since the line segments are straightly joined each other, the anchor points are specifically called corner anchor points.
You can continue drawing in this way. But we will end the first part of the drawing as in the example
There are several ways to end the drawing. After placing the last anchor point, move the mouse slightly away from the anchor point and press ESC on the keyboard to end the drawing. The name of this line is called an Open path. that is, the starting and ending points are the unconnected line
Ending with ESC key means pausing the drawing. We’re still holding the pen, but we’re not drawing. The cursor is still a pen tool icon. We can create new lines independent of the first line by placing new anchor points on the artboard.
If you think you’ve made a wrong anchor point and line, you can undo your drawing with CTRL + Z. (a key combination that I use very often :-))
Now let’s first create the independent second part as in the example.
- From your anchor point # 4 with your mouse, create a line as shown in the figure at 45 ° angles.
- After creating anchor point 7, end the drawing with ESC.
When you move your cursor away from the lines, you will see that the first line segment is unselected and the last line segment is selected. As you move your mouse over the lines, various pen shapes will automatically appear in the lower right corner of the cursor.
In the animation below, said pen tool shapes are shown. These shapes tell you how the cursor behaves when clicked. The cursor can behave differently on a selected line and an unselected line. Therefore, the left line segment in the animation appears selected and the right one appears as deselected. In order to understand whether the line is selected, the cursor must be moved to a blank area anywhere in the artboard

The shapes that appear automatically under the pen tool icon in the animation have the following meanings:
 | Normal drawing: A star-like multiplication sign means that the Pen Tool can make standard drawings by creating anchor points on the workspace. |
 | Extention: the shape is a forward slash. appears when the cursor is over the line end anchor point. If the anchor point is clicked, the line becomes continuous and new anchor points are created. |
 | Delete anchor point: appears when the cursor moves to the anchor point on the selected line. Clicking the anchor point deletes it and the new line is created between two closest anchor points. When used with SHIFT key the possible smoothest curve is created. |
 | Join anchor points: Appears when the cursor moves over the first anchor point of the new line segment after using the extension method on another line segment. if clicked, two line segments are connected. |
 | Add anchor point: The plus shape appears with the cursor on the selected line segment. if it is not selected, the plus shape does not appear. clicking on the selected line add a new anchor point. |
 | Create a closed path: the circle shape appears when the drawing process reaches the initial Anchorpoint. If clicked, Closed path created. |
 | Anchor point tool: Appears automatically after creating a new anchor point and disappears immediately when the cursor moves away. if the anchor point is dragged, anchor point handles appear. Released and repositioning the cursor shows a curved guide line. |
Now complete the drawing as in the animation and observe the cursor shapes during the drawing.
- join anchor points 3 and 4 first.
- Now join 7 and 1 to create a closed path.
I hope everything is alright. 🙂
Please Note:
| In addition to end drawing with ESC, joining two separate lines and creating a closed path naturally ends the drawing. | |
| Left mouse click with CTRL on an empty area on the artboard ends the drawing. | |
| SHIFT + Left mouse click creates a new line that starts from the path of the selected line. | |
| If the CTRL key is held down, the pen tool cursor icon turns in to the direct selection tool icon and acts as the direct selection tool. | |
| If the CTRL + ALT keys are held down together, the pen tool cursor icon turns in to the Group selection tool icon and acts as the group selection tool. | |
| If the ALT key is held down, the pen tool icon turns in to the anchor point tool icon and acts as the anchor point tool. | |
| When creating the anchor point, if the Space key is held down before the mouse click is finished, the anchor point can be moved. |
Part 2: Curve drawing
The pen tool is used for curve drawing in the illustrator. As shown in the curve drawing animation with the pen tool below, the left mouse button is held down and dragged anywhere on the workspace. The first click is the first anchor point of the curve to be formed. The anchor point is specifically called the Smooth anchor point. Two handles appear in the opposite direction of the cursor if the mouse button held down and dragged. These handles determine the direction and length of the curve to be created. when released and the mouse is moved, the curved preview appears. This preview is specifically called the rubber band. you can turn it on and off using the preferences dialog box.
By clicking on the second anchor point, the actual curve is created. if the curve is to be tangent to each other, the steps applied to the first anchor point are repeated.
The handles lengthen equally in both directions. However, if the ALT key is held down after creating the smooth anchor point, the length and angle of the second handle can be changed independently. The following animation shows how to do this.
If the tangent curve is not to be continued, that is, if a straight line is to be formed from the last anchor point, one click on the last anchor point with the Pen tool removes handle. You can now create a straight line from the anchor point.
The handles are normally controlled by the anchor point tool. The short cut key for the anchor point tool is Shift + C. On the other hand, we have seen that the handles can also be controlled by holding down the ALT key while the Pen tool is active. As long as the ALT key is pressed, the anchor point tool supersedes the Pen tool.
Part 3: Drawing from the template picture
Let’s test what we have learned with an example.
Template layers can help guide us when drawing from an image. When you create a new document a blank white artboard appears. If you want to draw something similar to the real-world you can import an image file and use it as a template layer. Actually the real-world mean here is not just the real photographs. Sketches can also be imported as a template layer.
To import an image as a template layer:
- Go to File>place
- Find your image and select
- Enable (Thick) template option
The Link option is used to determine whether to embed your image in the Illustrator workspace. If Link is selected, the image in the workspace disappears when the image on the disc is deleted or the path of the file is changed.
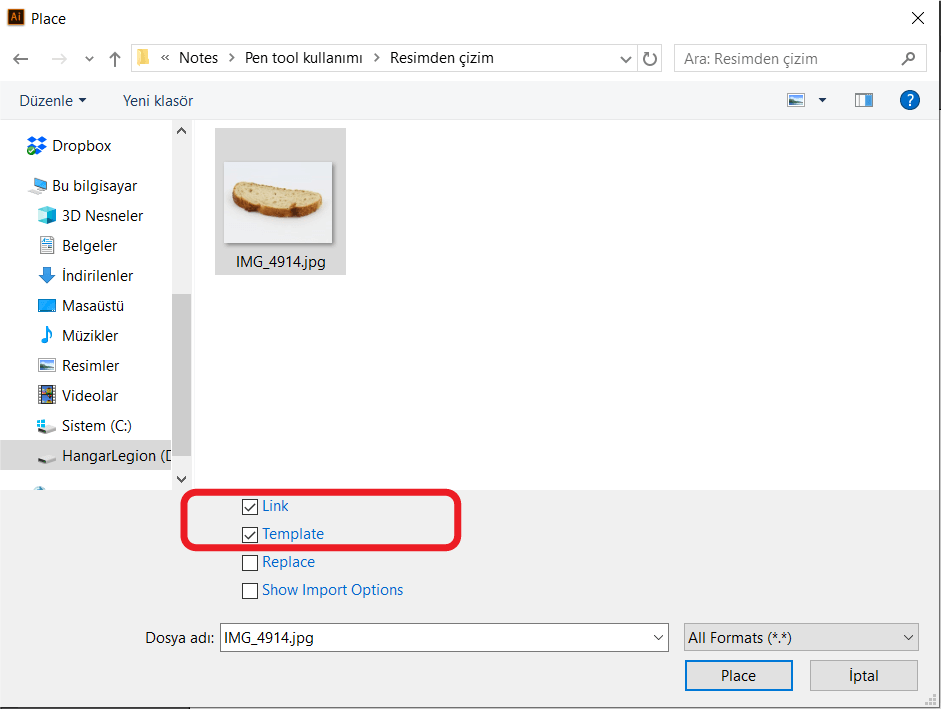
- Hit the place button to close the dialog box
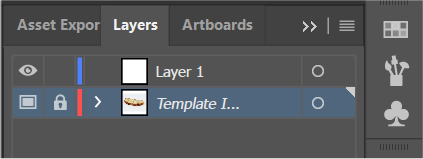
Placing the image this way creates a template layer. Dims the image %50 down. This will make the image more suitable for drawing on top of it. Finally locks the layer.
you can open up the layers panel to see the layer just created. if you do not see the layers panel go to the Window menu and select Layers.
If the image is bigger than your artboard, which I usually encounter, you need to scale down the placed image.
- First, unlock the layer
- Scale down the image
- Lock the layer again
When you finish your drawing you can delete this layer.
Since the layer is locked no drawings can be done on. switch the other layer or create a new one to draw your vector.
The main rule is to create the softest curves with as few smooth anchor points as possible.
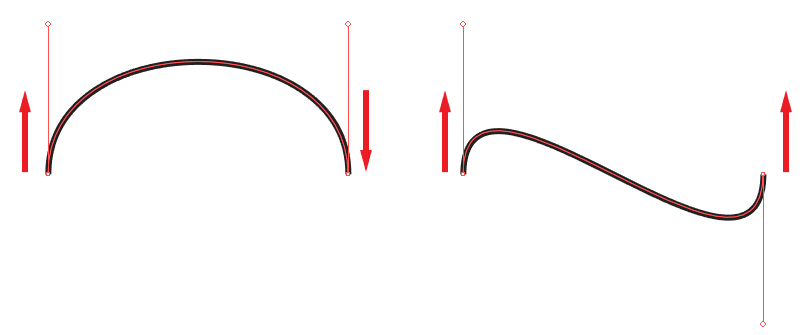
The basic curve is called the Bézier curve. Bézier curves can be either C-shaped or S-shaped. The direction of the handles creates the curve C or S. The following shows the direction of the handles at the anchor points for both curves. The drawing start point is the left side.
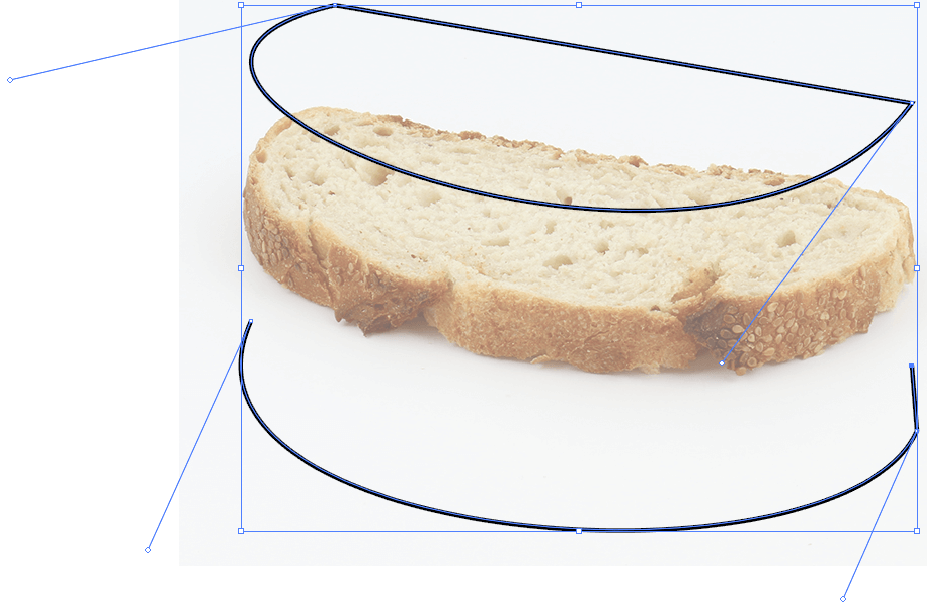
The curve drawings for the bread slice image are shown below. Bread slice was traced into a vector as a straight and curved segment with a total of 5 anchor points.
There may be a different number of anchor points for the same vector drawing. In the example below, the left-hand object has 13 anchor points. On the other hand, the object on the right contains 20 anchor points. Observe the vectors and note which anchor points are unnecessary. Imagine whether you can reduce anchor points! Remember that it is not always the goal to reduce the anchor points. Details may be lost. Focus on the bottom of the left object. !!!!
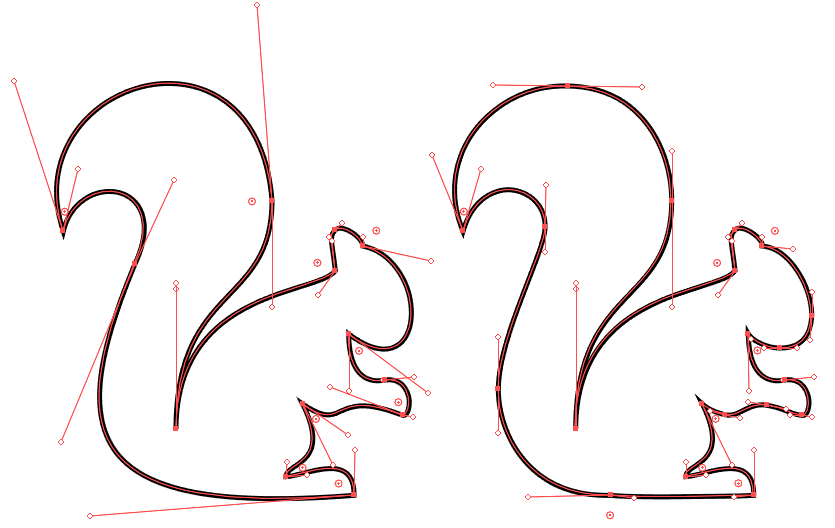
As you can see, the unnecessary anchor points on the right object are the ones in the middle of the curve.
So,
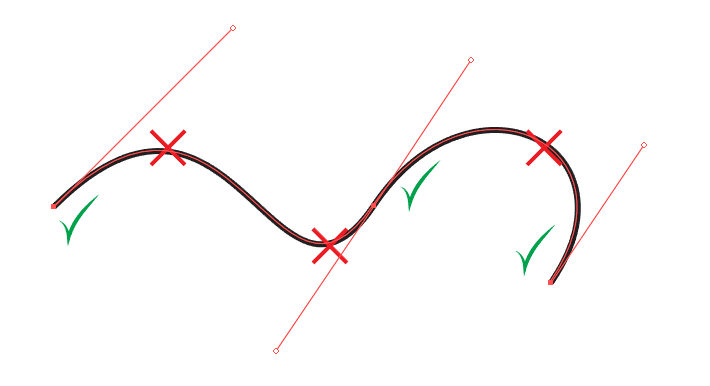
Do not place anchor points on the top of the “C” or “S” shaped curves in your own drawings. Don’t add an anchor point to each curve you see during your drawing as most designers do. This is not the correct drawing method.
Review the template object before drawing the vector over the image. Based on your imagination, create in your mind the “C” and “S” bezier curves. If so, start drawing from the corner. Draw an “S” or “C” shape.
Adding an anchor point to the top of the curve is a simple way of drawing. Because you don’t have to pay much attention to handles. On the other hand, it cost you extra anchor points.
Besides, We now know that the handles can be easily managed with the ALT key. So don’t be afraid to go back to the anchor points you’ve created.
Recall that anchor point selection is done with CTRL + left mouse. It will often be needed. Other necessary short cut keys have already been described above.
Good luck.
Akif Kutlu
P.S. The following videos are also be advised. They are in Turkish. But you can turn subtitles on and make auto-translate to your language.


